Three months without TW560 taken its toll on me. No long therapeutic drives across Switzerland’s beautiful landscapes. No tinkering with my TWIKE to keep it in tip-top shape.
After working really hard for a few weeks, I decided to take a day off from work and asked Andreas from Ksenotek if I could take on his offer to borrow his TWIKE – he happily agreed to give it to me for the weekend.
Just a few minutes after setting off with Andi’s TWIKE, I noticed that the controller was running a 7-year-old version of DFC’s software. Many of the goodies were missing – above all the display screens I had contributed which are geared towards making long-distance driving comfortable and informative.
I messaged Andreas if he would be OK with me updating the software and taking care of some other smaller problems with the vehicle. He gladly agreed (which is a very strange situation: you’re fixing your mechanic’s vehicle…)
Some day I will write an entry why a TWIKE needs to have a DFC3.0 to be complete. Any TWIKE without it – even the newest ones – are missing out on comfort and safety!
Back to the TWIKE I want to update: TW716:

I start the controller just to double-check if everything is nominal.

In order to get to the controller, we need to remove the battery cover behind the seats.
WARNING!
By opening the battery cover of a TWIKE you are exposing yourself to the risk of death by electrocution! Do NOT go ahead without knowing what you’re doing. DC voltages of 400V+ are not trivial!

With the cover off, it is clearly visible that this is a well-kept vehicle. No dirty tangles of old cables – everything is new and orderly. I’ve seen much, much worse (…this includes TW560!)

If we dive in a little more, we can see the main addition to an original TWIKE: the DFC3.0. It adds an extra data-rich and future-proof layer over the existing controller whilst being able to physically disconnect the batteries every time the TWIKE is turned off. No fussing about with physical key switches and gradual discharges due to battery management leftovers from NiCd configurations. shrugging

Going even closer, all the real magic happens on this little board. The SD card logs all relevant data every second. I have around 1GiB of Data (around 8 years of TWIKE life) and will someday take the time to dive into this data trove.

This board hasn’t gotten the TW560-post-India update yet – The upper PCB is not tethered to the main board. If the board comes loose, your TWIKE will start acting very strangely…Luckily, repairing this problem is easy – I’ve described how to do it here.

Time to dive into the TWIKE and set up my workspace! 🙂


The red connector on the smaller PCB is a TTL UART which gives me full access to the main CPU. Since this connector is non-standard and my PC doesn’t have a RS232 interface, I had to come up with a solution…
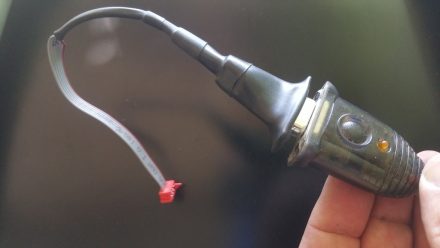
TTL > RS232 > USB: Time to connect DFC3.0 to my computer.

As a non-Windows user, there are certain programs that don’t exist in versions other than Windows which I have to run in my non-networked fully contained Windows virtual machine. NXP’s programmer is one of these pieces of software.

With my programmer able to see the serial port – we’re ready to configure the programmer.

Not configuring the programmer correctly can brick the CPU …and your TWIKE – be careful!
With this done, we’re ready to start updating!

This process will take around 5-7 minutes – image file verification, writing of image and re-reading it again.
During this time, you will see the serial communication indicator on your serial port on most of the time.

Thankfully, NXP’s programmer application shows in detail what is going on.

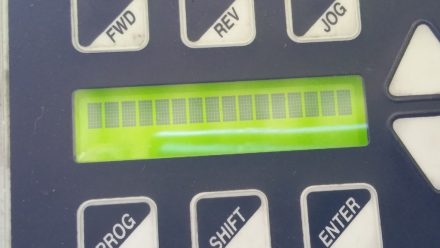
It’s always interesting to see the display panel react differently to the data being passed on to the CPU as during this time, there is no LCD update-routine taking care of the screen.
If everything goes well, NXP’s programmer app will show you this result:

After finishing the update process, it is important to reset the controller via 2 service commands – this will have it to do a hard-boot and read all configuration data again. Otherwise your TWIKE will act very strangely indeed! 🙂
Let’s check the controller after a hard reboot:

30 minutes worth investing! Again, as soon as I have some time, I’ll write a little more about the DFC3.0. Questions? Reach out to me.